Tuesday, December 10, 2013

INTRODUCING, JUVEDERM VOLUMA


The newest filler, Juvederm Voluma, recently received it's FDA approval for injection to the midface. This new filler is the third in the line of Juvederm products. It joins Juvederm Ultra and Juvederm Ultra Plus. All three of these fillers are Hyaluronic Acid (HA) based fillers. Hyaluronic acid is a naturally occurring sugar molecule in your skin that helps with hydration.

Voluma is formulated to help add volume to the cheek area. Voluma has a greater lift capacity than the other Juvederm products and therefore helps to lift and add volume to the midface/cheek area in order to restore contour to the face creating a more youthful appearance!


 If you are interested in learning more about Voluma or other fillers and to see if you are a good candidate, call our office for a consultation with Leah Kenney, PA-C or Julia Boucher, PA-C at 413-565-4400.

Tuesday, November 19, 2013

Save on Botox & Juvederm by doing your Holiday Shopping!


Most of our Botox and Juvederm patients have already heard of Brilliant Distinctions, a reward program through Allergan (the manufacturer of Botox and Juvederm) where the patient is able to rack up points for future treatments, which can be used to create coupons. Up until very recently the only way to accrue points was to get treatments of Botox or Juvederm. Each syringe of Juvederm or unit of Botox is equal to a certain amount of points. Each time a patient came to our office to have a treatment our receptionists would bank the appropriate points into the patient's account and then, before their next treatment, they could log on to their account to see if the points they had were high enough to create a coupon. This point system still exists, however, Brilliant Distinctions now offers a brand new way to get points!!

Introducing....the Brilliant Distinctions MALL!!


Now, when patients log on to their BD account they have the options of earning points by shopping at the Brilliant Distinctions Mall. Before you read further if you have not yet signed up for Brilliant Distinctions, go to Brilliant Distinctions and SIGN UP NOW! 

So, how does this Mall really work? Once you click on the Shop at the Brilliant Distinctions Mall Link on your BD home page you will be taken to a page that looks like this:


This page not only gives you access to TONS of stores that offer BD points, but it also informs you about any specials deals that are being offered! How convenient is that??? 
 You can search for your favorite store either by category or through the search bar at the top of the site. If you aren't sure what you are looking for simply browse through the deals or popular retailers!

Once you find a store that you would like to shop at, you can click on the icon of the store and it will take you to a page showing you how many BD points you will earn per dollar and showing any deals that are being offered. Here are some examples:


Now, you are ready to SHOP!

Click the SHOP NOW purple button and it will bring you right to the store's website where you can shop your heart out! 


It's a simple as that! Do your Holiday Shopping through Brilliant Distinctions from the comfort of your home and earn points for your next Botox or Juvederm treatment! 
Now, go SHOP!

Tuesday, September 10, 2013

Mommy Makeover 101

After giving birth many women experience a significant change in their body. Both the abdomen and breasts can change dramatically, leaving women feeling as though they no longer recognize their body.

During pregnancy the rectus abdominis muscles in the abdomen spread to allow room for the growing uterus. In some women these muscles don't come back together the way that they were prior to pregnancy. This, along with loss of tone of these muscles leads to a bulging rounded appearance to the abdomen. Many women complain of still looking pregnant even after spending countless hours in the gym. Unfortunately there is no amount of diet and exercise that will completely fix this issue. Other complaints in the abdomen from postpartum women include sagging stretched excess skin and stretch marks. While this is partly related to the amount of weight gain or multiple pregnancies, genetics also does play a part in the degree of severity. Unfortunately it's not just the abdomen that is affected following pregnancy, the breasts also can change. Most women complain of droopy, deflated breasts following pregnancy and breast feeding.


While these changes are well worth it in exchange for creating a human life, it doesn't mean women are condemned to live with them forever. So, what can be done to give these women back their pre-baby bod? This is where the "Mommy Makeover" comes into play. This is a term coined to refer to the different surgeries that can done to correct the changes occurring following pregnancy.

Most classically a Mommy Makeover involves an Abdominoplasty or "Tummy Tuck". This can be either a Mini Tummy Tuck or a Full Tummy Tuck. The Mini Tummy Tuck involves correction of the diastasis recti along with a small excision of skin. Women who have a small amount of excess skin below the umbilicus (belly button) only and a diastasis recti qualify for this procedure. Most women require a Full Tummy Tuck which corrects excess skin above the umbilicus, hooding of the umbilicus, excess skin below the umbilicus and diastasis recti. Liposuction of the flanks or "love handles" is usually performed at the same time as a Tummy Tuck if there is excess fat. Usually liposuction alone is not an option, but if there is truly only excess fat in the abdomen and no excess skin or separation of the muscles, this could be an option.

 Breast surgery as part of a Mommy Makeover typically includes a Breast Augmentation, Breast Lift or combination of the two. Many women coming into the office believe they need a Breast Lift as they complain of sagging droppy breasts. This may be true, but many women do not actually have true ptosis (drooping) of the breast, but have lost the volume in the breast and have that deflated balloon look. A silicone or saline implant is used to best correct this by filling up the breast to what it was prior to pregnancy or larger if the woman so desires. True ptosis involves the position of the nipple as depicted in the picture below. A Breast Lift will correct the position of the nipples bringing it back up where they should be pointing forward instead of towards the floor. This will also remove any excess skin. Sometimes the issue is both the position of the nipple and a loss of volume. For this an Augmentation and Lift could be performed together.

 
These procedures are typically performed in the hospital as day stay procedures under general anesthesia. If both an abdomen and breast surgery is desired, these can usually be performed at the same time. Recovery from procedures such as these is typically between 4-6 weeks. Just like any surgery, these procedures do have risks associated with them which can be discussed in detail at a consultation visit.

To learn more about the Mommy Makeover or to find out which specific surgeries would be right for you call the office to set up a consultation with Dr. Brooks. 413-565-4400

Tuesday, August 20, 2013

INTRODUCING COOLSCULPTING


We are so happy to announce that we will now be offering Coolsculpting at The Office of Dr. Glen Brooks! 
Coolsculpting is a non-surgical method of fat reduction that uses cryolipolysis to permanently kill fat cells. Cryolipolysis is the use of controlled cooling to injure and kill subcutaneous fat cells while keeping the overlying skin unharmed. This method of fat reduction requires NO surgery and NO downtime! You can have the procedure performed on your lunch break and you can work out the same day! There are very minimal side effects with the most common being redness, bruising, swelling, tenderness to the touch, cramping, itching, tingling and numbness. Coolsculpting permanently kills 20-25% of the fat cells in the treated area.This is great for that stubborn pocket of fat that just doesn't go away even with diet and exercise! If 20-25% of the fat in an area isn't enough, the area can actually be treated again for further fat reduction and an additional 20-25% reduction can be expected.


So, what does this procedure actually entail? Well, I was lucky enough to be able to try it firsthand before we decided to offer it at our office. The most popular places to have this procedure performed are all of those areas in the mid-section with cute little names such as love handles, belly pouch and muffin top.The bra strap roll is another area that gets great results from this procedure. The mid-section is not the only area that can see great results though, the upper arms can be treated as well as the inner thighs. I decided to stick with one of the typical areas and had my love handles treated. Just like any procedure we do at our office the first step is to have pictures taken. After that the area to be treated is marked using a plastic applicator and a washable marker. Next a cold wet gel pad is applied over the area to be treated. This isn't the most appealing thing, but it is necessary since it helps to protect the skin. The applicator cup with suction is then placed over the area marked to be treated. The skin and fat is sucked up into the cup. Now, I'm not going to lie, this is initially a little uncomfortable, but it is very bearable. I mean, if you take your skin and pull it up, well, it hurts! In the beginning is also feels REALLY cold, but your body gets used to it shortly and for the remainder of the treatment there is only mild discomfort if any! For most areas the applicator is put on with the patient standing up and then the patient is positioned on a bed with lots of blankets and pillows to ensure complete comfort!

Below is a picture of the applicator with the suction on. You can see my skin and fat sucked all the way up into it!

I was able to check my email, spend some time on facebook and pinterest and watch a TV show on my ipad all while getting rid of my fat! One important thing to note is that while yes you can do lots of things to keep yourself occupied during the treatment, you can't get up or really move around at all for danger of the applicator popping off. If the applicator comes off in the first ten minutes, it can be put right back on without an issue, but if it's after that it's considered another treatment and has to be payed for. So, being relatively still is a must. Also, remember to go to the bathroom before you start your hour long treatment so you don't end up having to pee half way through! 

Below is a picture of me all set up watching a show on my ipad during my treatment!
 
Now, obviously with an area like the love handles, the treatment takes 2 hours since each area needs to be treated for 1 hour. A little before the end of the 1 hour you will feel a slight difference as the machine goes into massage mode. The medical professional adminstering the treatment will be notified by the machine 2 minutes before it ends and will come up to take it off as soon as the treatment ends. There is no pain as the machine comes off. The treated area looks red immediately after the machine is removed and the area that was sucked farthest into the cup is raised and looks like a big red stick of butter. Don't worry, this goes right down after it is massaged. In my opinion the massage was the worst part of the whole procedure, but others who have been treated say it didn't bother then at all. It is not that the massage actually hurts, but more that it feels like pins and needles or like running your hands under warm water after being outside in the snow with no gloves. The massage is done by the medical profressional adminstering the treatment and only lasts about 2 minutes.
 
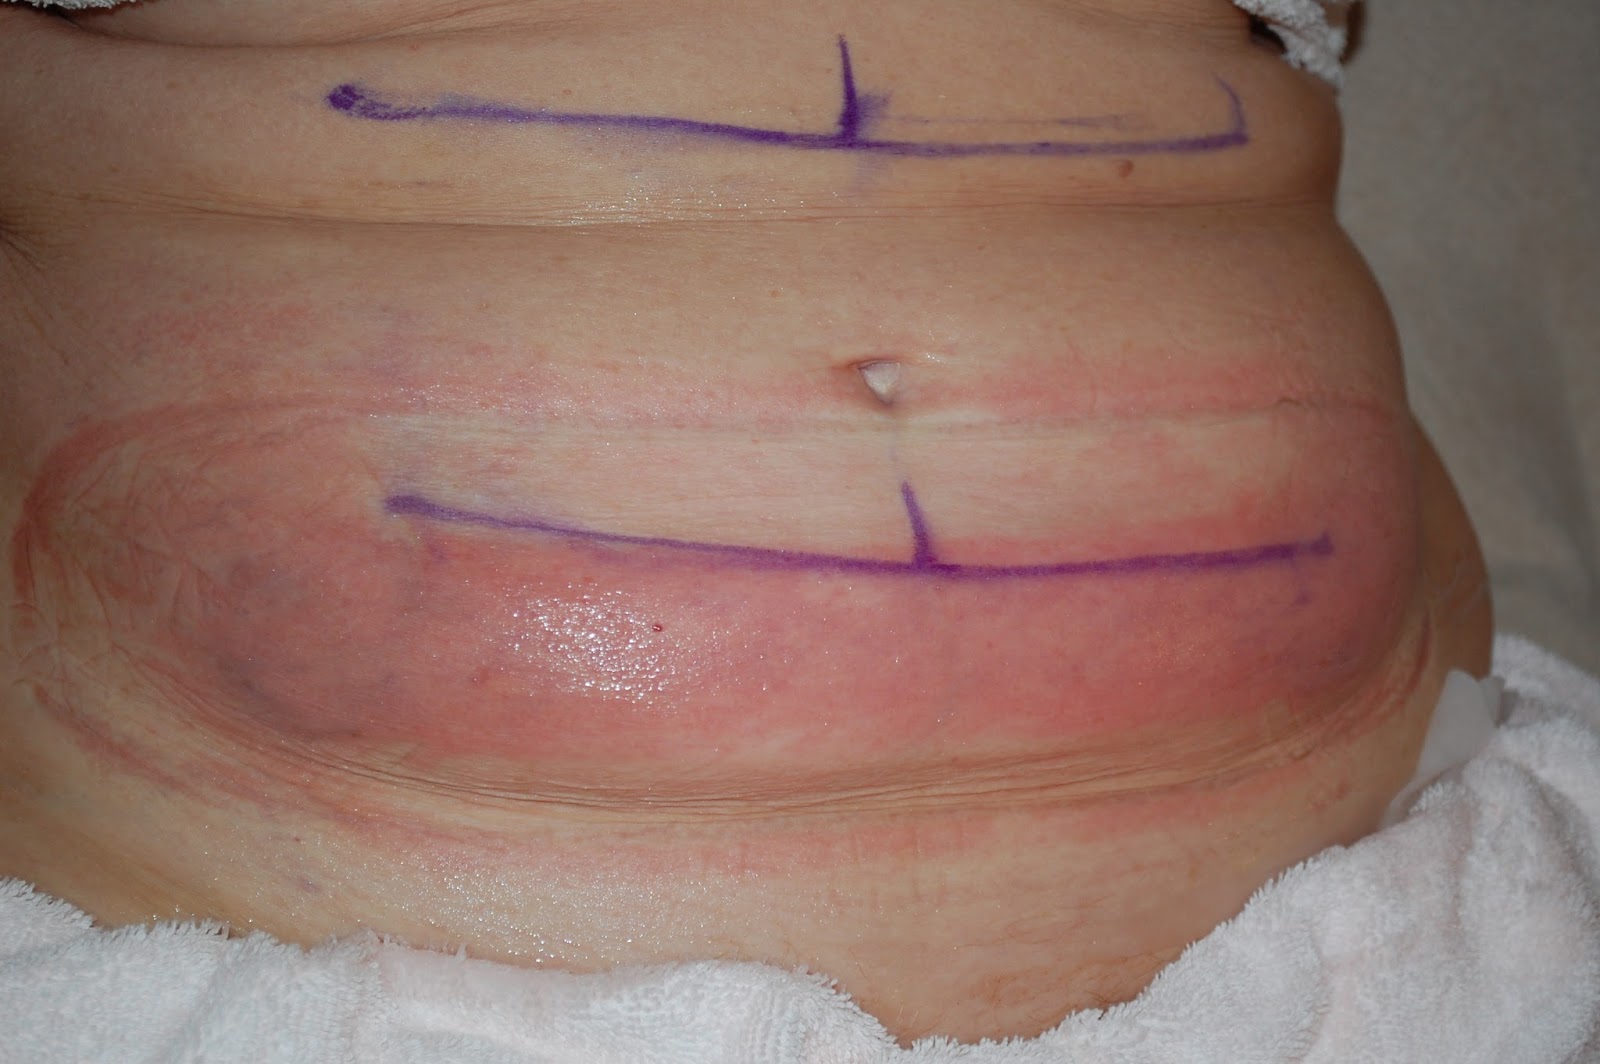
Below is a picture of what the treated area looks like immediately after the applicator is removed. (Unfortunately I was not able to get a picture of myself, this is of another patient who had the treatment performed to the lower and upper abdomen)

After this, the treatment is DONE and you are free to go about your life with no restrictions whatsoever. I was able to go backpacking the next day and hike 6 miles with no discomfort! Some people who have been treated did report some discomfort after and and some reported it was enough to keep them from being able to work out. This discomfort can be diminished or potentially prevented by wearing compression in the treated areas. The one side effect that I did note was numbness. I had numbness in the treated area for about 3 weeks following the procedure. 

So, what about results? Just like most procedures, it takes a little while to see the results. Coolsculpting results usually take between 2-3 months to see, however earlier results have been reported. I personally started to notice a difference in how my pants fit around my sides about a month after the procedure. I continued to see a difference during the 1-2 month period after my treamtent and by probably 9 weeks I saw the final result. One of the best things about Coolsculpting is that it really does work and works on every single patient! No matter what, 20-25% of the fat in the treated area will be destroyed permanently!

-Julia Boucher, PA-C

To learn more about Coolsculpting and determine if it is the right treatment for you
 call the office to make an appointment for a consultation with
 Dr. Brooks, Leah Kenney PA-C or Julia Boucher PA-C
413-565-4400
www.drglenbrooks.com

Check out some before and after pictures below to see the results for yourself!
Before on the left, after on the right.


Typically, there is minimal to no downtime after the treatment though patients may experience temporary pain or discomfort. Side effects can include redness, bruising, swelling, tenderness to the touch, cramping, itching, tingling, and numbness. Numbness can persist up to several weeks after a procedure. - See more at: http://www.coolsculpting.com/how-it-works/patient-faqs#sthash.GEeiGnqW.dpuf

Tuesday, June 11, 2013

WHAT IS IMPLANT BASED BREAST RECONSTRUCTION?


As most people have heard by now, actress, Angelina Jolie reveled recently that she has made the difficult decision to undergo a bilateral nipple sparing mastectomy after finding out that she was positive for the BRCA1 (breast cancer) gene. Angelina disclosed her decision along with a brief account of what the road to reconstruction consisted of for her through an op-ed in the New York Times. Her decision to not only go through these procedures, but to share her experience with the world is courageous and  inspiring to women around the world.

Breast Reconstruction Awareness is on the rise with help from the Plastic Surgery community and ASPS naming a national BRA (Breast Reconstruction Awareness) Day in October, as well as actresses or other people in the spotlight coming out about their experience with either breast cancer or as in Angelina's case, a genetic susceptibility towards breast cancer. With these stories being out there for every day women to read, it opens up the opportunity for them to seek further information. Women who have a family history of breast or ovarian cancer may be more likely to ask their Doctor about BRCA testing and women who are deciding whether or not to undergo prophylactic mastectomy with breast reconstruction may feel empowered and inspired to make that decision after hearing another woman's story.

Angelina opted for an implant based approach to reconstruction which is becoming more and more popular and is quite appealing to most women as it usually means less time in the hospital after surgery and an easier road to recovery. The process of this reconstruction starts at the day of the mastectomy. Most mastectomy's these days are skin sparing, meaning the breast surgeon takes all of the breast tissue along with the nipple areolar complex, but leaves the skin envelope. Angelina Jolie actually had a nipple sparing mastectomy, meaning all of the breast tissue was removed, but the skin and nipple areolar complex was left intact. This may be an option for some women depending what type of breast cancer they have or if they are having prophylactic mastectomies. This is something that should be decided with the breast surgeon. As the skin envelope is left with either type of mastectomy it is easy to fill this up with either a tissue expander or implant immediately after the breast surgeon has finished their part of the surgery. Most commonly tissue expanders as used so that the skin and muscle can be gradually expanded. Tissue expanders are implants that have a metal port so that they can be gradually filled with saline, both in the operating room and in the office after everything has healed. These are placed under the pectoralis muscle as illustrated in the picture below.


Once the tissue expanders are filled to the appropriate size they can then be exchanged for an implant of the same size. This usually happens approximately 3 months after the initial surgery. With the availability of devices such as shaped silicone implants as shown in the picture below, plastic surgeons are able to create a very natural and real looking reconstructed breast.


Dr. Brooks was asked recently to talk about what a Double Mastectomy with reconstruction is, check out this video of his appearance on Mass Appeal regarding this subject!


Tuesday, May 7, 2013

WHAT'S THE RIGHT AGE TO START ANTI-AGING?


Anti-aging treatments start a lot younger than we think! Good parents start their children on an "anti-aging" regime the very first year of their life by making sure their kids are always smothered in sunscreen! People who then avoid the sun or wear sunscreen religiously and avoid things like smoking and a poor diet end up with much smoother, tighter, younger looking skin when they reach their 40s than those on the other end of things. So, anti-aging isn't just about treatments it's about PREVENTION! If you never form those wrinkles than you won't have to do those things to get rid of them! Or more realistically (since we will all form wrinkles eventually) you will be able to get rid of them much easier! 


Patients are frequently coming to the office for a facial rejuvenation consult for either fillers or neuromodulators (botox, dysport, xeomin) and asking us, am I too young to be starting this? How old are most of your patients? Patients are frequently worried that if they start something like Botox or Juvederm early on it will somehow make things worse going forward. This could not be FURTHER from the truth! Botox and other neuromodulators can actually be a form of wrinkle prevention! Yes, they work great as a treatment for wrinkles that are already exist, but they work even better for preventing those wrinkles from ever forming. Neuromodulators work by preventing the muscles from moving, so therefore, if those muscles don't move and then the skin doesn't crunch, well, you never get those wrinkles! So, NO, starting in your 20s or 30s is not too young! 

As far as when to start an anti-aging skin care routine at home, there is no right answer. As mentioned earlier, starting with sunscreen and healthy behaviors should be a life long thing! But when to start things like retinoids and glycolic acid treatments depends a lot on each individual's skin. If you notice fine lines and wrinkles, it may be the time for you to start. Certainly if you are getting fillers or botox you should defnitely be adding in an at home anti-aging regime! If anti-aging is something that crosses your mind when examining your skin in the morning, then you are probably ready! 


For more information on what you should be doing for you skin come to the Spa on the Green for a skin-care consultation with either Jen or Heather (our lovely aestheticians). Call 413-565-2405 to make your consultation today!


Tuesday, March 26, 2013

THE SKINNY ON FAT GRAFTING

What is Fat Grafting?
 
Fat grafting or fat transfer consists of harvesting fat cells from one part of the body (abdomen, hips, etc) via liposuction and then injecting these fat cells into another part of the body (face, buttocks, hands, breasts). Fat grafting is a technique that has been around for a long time and is commonly used by most plastic surgeons in at least one or two avenues.

Fat Cells
 
What can Fat Grafting be used for?
 
 
Fat grafting can be used for both cosmetic and reconstruction surgery. We commonly use fat grafting as a means of facial rejuvenation, whether alone or in conjunction with a traditional face lift. In this way it works similarly to fillers by helping to give volume to places such as the nasolabial folds, marionette lines, cheeks and lips. Fat grafting is also used commonly to add volume to the buttocks or to help achieve the desired round shape of the buttocks. In our practice we also very commonly use fat grafting as part of our implant based breast reconstruction. We use fat to fill out the upper pole of the breast where there is naturally some concavity after a mastectomy.
 
 
 What are the risks of Fat Grafting?
 
 
Just like any other procedure that we perform, there are certain risks associated with fat grafting. Risks that exist for all of the surgeries we perform include infection, bleeding, poor scar formation, asymmetry and need for revision surgery. Specific to fat grafting, the biggest risk is that the fat may not "take". Some of the fat that is taken from one part of the body and injected into another part of the body may be absorbed by the body, may become liquified and form a cyst, may calcify or may produce scarring within the tissue. On average approximately 30-50% of the fat that is injected will "take" and be incorporated into the body as a living tissue. Usually by 6 months to 1 year from surgery it is apparent how much of the fat that was injected has survived and at this point whatever is there will most likely be permanent. Other risks include the risks associated with the harvesting of the fat such as a seroma (a collection of fluid), hematoma (a collection of blood) or a contour deformity.

There are things that can be done in order to prevent some of these complications. The most important thing you can do to decrease your risk of having a complication (and this is true of ANY cosmetic or reconstructive procedure) is to make sure that you are going to a Board Certified Plastic Surgeon for the procedure. There are many Physicians out there performing cosmetic procedures, liposuction being a very common one, who are NOT Board Certified Plastic Surgeons. In our opinion you are just asking for a complication if you do not seek out a Board Certified Plastic Surgeon to perform your surgery. To avoid some of the risks associated with liposuction your Doctor will have you wear compression to the donor area following the procedure. To ensure that as much of the fat as possible sticks around you should avoid anything that will compromise the blood supply to your newly transferred fat. This means avoid compression in this area as well as ice. For example, when a buttock augmentation is performed using fat grafting the patient must avoid sitting directly on their buttocks for 2 weeks.
 
 
What is Cytori PureGraft?

 
Dr. Brooks uses the only FDA approved fat grafting system, Cytori Puregraft®. Puregraft® is a lipofiltration system that allows for a quick preparation of fat for fat transfer in a single-use, sterile, closed environment. The Puregraft® system drains any excess tumescent fluid, (a fluid injected into the body prior to liposuction) free lipids, and blood from the lipoaspirate and then allows the lipoaspirate to be washed with saline using a sterile technique. This ensures that the fat harvested for grafting purposes is uniform and consistent and prepared in a timely fashion, helping the graft have a greater chance of being viable, i.e. more fat take.


What is the truth about Fat Grafting for Breast Augmentation?

 
Although fat grafting is widely accepted as common practice for things just as facial rejuvenation and adding volume to the buttocks, the jury is still out on using fat for primary breast augmentation, as a substitution for implants. Currently, fat grafting is used to enhance the results of breast reconstruction after mastectomy or lumpectomy and to improve the results of implants by helping to reduce rippling and wrinkling or visibility of implants. Although fat grafting may seem appealing to some patients over an implant, there are some things to consider when making the decision if it right for you. One limiting factor is the volume that can be achieved. Women can expect to achieve less than a cup size in difference with fat grafting, while implants are able to achieve much more volume. The amount achieved is also unpredictable as only 30-50% of the fat injected will establish it's own blood supply and live. The cells that do live also can fluctuate with any weight loss or weight gain causing a difference in breast size with any difference in weight, something that obviously would not happen with a silicone or saline implant. One last consideration is whether or not fat grafting could obscure the readings of future mammograms or be mistaken for early breast cancer. There is not concrete evidence to say one way or the other, but it is a potential risk. Women who have had fat grafting to their breasts or implants should always let the technician know they have had such procedures done prior to any breast studies.

How do I learn more about Fat Grafting?
 
 
If you are interested in learning more about Fat Grafting or are wondering if it is the right choice for you, call our office at 413-565-4400 or visit Our Website to book a consultation with Dr. Brooks.

Disclosure: This post is not sponsored by Cytori.

Tuesday, March 5, 2013

BREAST IMPLANTS: SALINE VS. SILICONE


As you may have realized from our previous post about sizing for Breast Augmentation, deciding to have a Breast Augmentation is just the beginning of a series of decisions! One of these (very important) decisions is whether to use Silicone Gel Implants or Saline Implants.


left: silicone, right: saline

The majority of our Breast Augmentation patients could go with either Silicone or Saline implants and get a desirable result, however, there are certain patients that we would recommend one vs. the other. Saline implants are more prone to rippling and wrinkling and therefore should be avoided in patients with very little breast tissue as this rippling and wrinkling could be felt and sometimes seen, especially underneath the breasts and laterally along the side of the breast closest to the underarm. Saline is also heavier than silicone and therefore causes more pull on the tissues. This can be a problem if you are going with a very large implant as it can stretch out the tissues leading to premature drooping. Patients who already have some droop of the breast may also want to avoid saline implants as to not increase their problem. The weight of Saline can also be a good thing though, specifically in patients who have tight skin and a tight pectoralis muscle. The weight of a Saline Implant in this body type helps to stretch out the tissues allowing the implant to drop into the bottom of the breast and create a natural shaped breast. Patients who are younger than 22 years old who have never had implants before must also go with a Saline Implant as indicated by law.

A question asked by all of our patients is, are Silicone Implants less safe than Saline? The answer to this is that both implants are equally as safe. Saline Implants actually do have a Silicone hard shell that is then filled with Saline, so in both Implants the Silicone hard shell is what comes in contact with your actual tissue. The issue comes in with the rupturing of the Implants. Silicone and Saline implants, will eventually rupture just as a pair of jeans you wear everyday will eventually get a few holes in the knees. The cause of a rupture is usually not traumatic, but caused simply by wear and tear of the Implant being inside your tissue. That being said, traumatic rupture can occur, particularly with a penetrating trauma. If Saline Implants rupture, the Saline, which is basically salt water will slowly leak out and your body with absorb it and you will notice within a few days that one breast is quite smaller than the other. With Silicone implants, as the Silicone these days is Semi-Cohesive, making it the consistency of jello, the shape/size of the breast will not change. The Silicone will usually create a small bubble at the rupture site and your body may even form a scar around this. Usually this silicone will stay in the pocket where the implant is. This rupture will not cause any signs or symptoms and is therefore referred to as a silent rupture. The FDA recommends that in order to check for this silent rupture patients who have Silicone implants should get an MRI to check for a rupture starting 3 years after implants are placed and continuing every 2 years after that. Unfortunately, the MRI is not covered by your insurance as Breast Augmentation is a cosmetic procedure.

At our practice the majority of our patients end up going with Silicone implants, but as mentioned above, Saline Implants definitely have their place as well! At a consultation with Dr. Brooks he will examine you in order to determine whether a Silicone Implant or a Saline Implant will give you the best result. If you are interested in learning more about Breast Augmentation surgery call the office at 413-565-4400 to make a Consultation with Dr. Brooks.

Tuesday, February 12, 2013

HOW TO BEAT THE SKIN WINTER TIME BLUES

Does your
SKIN
have the
Winter Time Blues?


It's February...that time of the year when Winter seems to draaag on and we wonder if the elusive sun will ever shine again, or if we will ever see those little green buds appear on the trees ensuring that spring is in fact coming. We tend to find ourselves dreaming of vacations to places looking something like this...


Not only does our head and heart seem to be effected by the dragging on of winter, but our SKIN can also get the blues! Does your skin seem to be crying out for relief from the winter time blues? While we may not be able to wish winter into exiting any faster, we can help cure those SKIN winter time blues! Three easy steps will get your skin back on track and turn that frown upside down!

1. Avoidance
 Sometimes the most important thing you can do is not something you do at all, but something you don't do! 

Avoid long hot showers- As tempting as it may be to turn that dial all the way up until the water is scalding, it is one of the worst things you can do for your skin! Those scalding temps can strip the skin of it's natural oils, leaving you feeling as dry as a desert. Stick to a warm shower instead of a hot one. If you are feeling particularly chilled to the bone and need a little thawing, look to a nice steamy bath. Add a little something extra, such as olive oil, to the water to add some of that natural moisture back into your skin. Or, try some coconut oil and drift off into that daydream again...

Avoid over-cleansing and over-exfoliating. In the summer months foaming cleansers with added exfoliants are excellent (depending on your skin type), but even the oiliest skin can get dry in the winter from over-cleansing and over-exfoliating. This doesn't mean that you necessarily must completely cut out using exfoliating products, such as ones containing Alpha Hydroxyacids, but it does mean that you may want to cool it just a little bit. Instead of using these products daily, or twice daily, try going to to every other day, or every two days. Try using a moisturizing non-foamy cleanser during the off days. This will give your skin a break and help your natural oils to replenish giving skin back some moisture! 

 
2. Moisturize Moisturize Moisturize
 
Finding a good moisturizer that you like is the number one essential step to surviving the winter. Even you oily-skinned folks out there must use a moisturizer on your skin in the winter time. The best time to apply your moisturizer is when the skin is still a little damp so that the water can really get locked-in to your skin and hydrate properly. So, apply your moisturizer right after cleansing for best results. And don't forget the rest of your skin! We focus on the face the most, but your body and especially your hands need a little attention too! Never use the same moisturizer you use on your body on your face or vice versa. The skin on your face is completely different from the skin on the rest of your body, and therefore needs to be treated differently, and with a little more attention. And obviously you don't want to waste that goodness on the rest of your body!
  
3. Protection

Last but not least, don't forget to PROTECT that skin!

Protect your skin from the SUN. Even though the sun doesn't seem to shine quite as brightly in the winter months and you aren't spending as much time basking in it, it is still very important you wear some form of sunscreen every. single. day. Even walking from your house to your car and back again exposes your skin to some rays and those rays can be damaging causing premature aging and skin cancer. We recommend using at least an SPF of 15 for the best protection. Physical sunscreen, containing ingredients such as zinc oxide and titanium dioxide are the best. At Spa on the Green we offer two options for sunscreen, Solar Defense, a physical sunscreen with an SPF of 30 or Solar Defense-E, the same sunscreen with a moisturizer added to it. 

Protect your skin from extreme cold and extreme wind. This one is kind of a no-brainer, going outside in those extreme temps, especially when the wind is howling away will only add to the problem, so avoidance is best. But, if the snow slopes are calling you, just make sure to cover up as much of that precious skin as possible to avoid the dreaded wind burn! If you hit the slopes too hard and forget your protective face mask stop by Spa on the Green to pick up some of our BrookskinMD Rosaluxe Hydrating Balm, a special moisturizer that contains Hydrocortisone for added relief

Tuesday, January 29, 2013

How to Make Rice Breast Implant Sizers

One of the most important steps in a successful Breast Augmentation is deciding on the size of the implant. This decision can be somewhat overwhelming and requires proper sizing. Sizing can be done in a variety of ways, at our office we encourage patients to do multiple forms of sizing.

Prior to surgery when patients come for their pre-operative visit we do sizing with them by having the patient bring a sheer bra in the cup size they are looking to become with a tight shirt, or even a few outfit changes with different color shirts. We then have them try on different sized silicone implants inside their bra in an attempt to mimic what they will look like after surgery. We help make sure that the size or sizes they are looking at are possible with their specific anatomy and are in proportion to the rest of their body. The final decision is made at this appointment.

Before this pre-operative visit occurs we find it very helpful to have patients do some sizing on their own at home. Sometimes the 30 minute appointment in our office is not enough time to make such a big decision, so it is very helpful if the patients comes to that appointment already knowing around what size they would like to be. At home sizing also allows the patient to spend as much time as they need wearing the sizers with multiple style tops to determine what size best suits them. Since most people don't have an array of different sized silicone implants laying around at home to try on inside their bra, the best way to get the same effect is to make sizers using rice and pantyhose- two things that most women DO have hanging around the house!

Supplies:
  • Dry Rice
  • Measuring Cup
  • Pantyhose or Knee Highs
  • Scissors


Step One:
If you are using pantyhose, cut the leg of each hose approximately half way down so that they are essentially like knee highs. If you are using knee highs, skip this step! Make sure the pantyhose you are using don't have any holes in them, or else you will end up with quite a mess!

Step Two:
Stretch the opening of the pantyhose where you will be inserting rice as to allow easy insertion of the rice.

Step Three:
Measure out the amount of rice that will be inserted into the pantyhose.

If you are using cups these are the approximate measurements to use for guidelines:
1/4 Cup = 75cc
1/2 Cup= 125cc
1 Cup= 250cc

If you are using ounces, each ounce equals approximately 30cc.

Step Four:
Insert equal amount of rice into each side of the pantyhose. Press the rice down into the toe of the panty hose and sculpt to form a round shape. Then tie off the pantyhose with a knot at the top. Cut off the excess fabric above the knot and voila, you have your sizer!

It should look something like this:


This can be worn inside a sheer cup bra or inside a sports bra. Try a few different sizes making sure to keep track of how much rice you are using and which sizes you liked the most!